Hey Buddies , Wanna control a car with just TV remote ? Here's what you need to learn
You would need IR library , only then you may successfully build it
Get IR library from here and put it on Libraries folder of Arduino in C drive(location where you have installed)

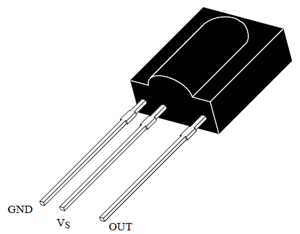
Before directly connecting first we have to find the values of TV remote , Follow the given connections.
2.Arduino Gnd to pin 1
3.Arduino pin 6 to pin 3
After connecting in the mentioned way upload this code
#include <IRremote.h>
int RECV_PIN = 6;//pin 6 of arduino to data pin of ir receiver
IRrecv irrecv(RECV_PIN);
decode_results results;
void setup()
{
Serial.begin(9600);
irrecv.enableIRIn(); // Start the receiver
}
void loop()
{
if (irrecv.decode(&results))
{
Serial.println(results.value);
irrecv.resume(); // Receive the next value
delay(1000);
}
}
Open the Serial Monitor and then try pressing different buttons , the value of the button pressed will be displayed on the Serial Monitor .
Designate 5 buttons
1.Forward
2.Reverse
3.Left
4.Right
5.Stop/Brake
Note down the values it will be used later

You would need IR library , only then you may successfully build it
Get IR library from here and put it on Libraries folder of Arduino in C drive(location where you have installed)

 |
| Fully constructed |
 |
| Thing you need |
 |
| Motor Shield |
 |
| Arduino Uno |
Components Required :-
1.Chassis
2.Wheels (one castor + two normal wheels)
3.Arduino uno
4,H bridge (L293D Motor Driver IC)
5. DC motors 500 RPM (2 pcs)
6.Breadboard
6.Breadboard
7.TSOP1738 IC
8. 9V battery (2 pcs)
9. Jumpers
10. TV remote
Before directly connecting first we have to find the values of TV remote , Follow the given connections.
Test Connection(for TSOP1738 and Arduino)
1.Arduino Vcc to pin 22.Arduino Gnd to pin 1
3.Arduino pin 6 to pin 3
After connecting in the mentioned way upload this code
Code :-
// lookforlk.blogspot.com#include <IRremote.h>
int RECV_PIN = 6;//pin 6 of arduino to data pin of ir receiver
IRrecv irrecv(RECV_PIN);
decode_results results;
void setup()
{
Serial.begin(9600);
irrecv.enableIRIn(); // Start the receiver
}
void loop()
{
if (irrecv.decode(&results))
{
Serial.println(results.value);
irrecv.resume(); // Receive the next value
delay(1000);
}
}
Open the Serial Monitor and then try pressing different buttons , the value of the button pressed will be displayed on the Serial Monitor .
Designate 5 buttons
1.Forward
2.Reverse
3.Left
4.Right
5.Stop/Brake
Note down the values it will be used later

Full Connections:-
1.Arduino pin 6 to TSOP1738 IC
2.Arduino pin 8 to Motor Shield pin 2
3.Arduino pin 9 to Motor Shield pin 7
4.Arduino pin 10 to Motor Shield pin 10
5.Arduino pin 11 to Motor Shield pin 15
6.Arduino VCC to Motor Shield VCC
7.Arduino GND to Motor Shield GND
8.TSOP1738 pin 1 to Arduino VCC
9.TSOP1738 pin 2 to Arduino GND
Since you cannot connect more than one pin in Arduino Vcc and Gnd , connect the terminals in common and proceed
int lm=9;
int lmr=8;
int rm=10;
int rmr=11;
int RECV_PIN = 6;
IRrecv irrecv(RECV_PIN);
decode_results results;
void setup()
{
pinMode(lm,OUTPUT);
pinMode(lmr,OUTPUT);
pinMode(rm,OUTPUT);
pinMode(rmr,OUTPUT);
Serial.begin(9600);
irrecv.enableIRIn(); // Start the receiver
}
void loop()
{
if (irrecv.decode(&results))
{
Serial.println(results.value);
irrecv.resume(); // Receive the next value
}
//bot moves front
if(results.value==1515192842)
{
digitalWrite(lm,LOW);
digitalWrite(lmr,HIGH);
digitalWrite(rm,HIGH);
digitalWrite(rmr,LOW);
}
//bot moves back
if(results.value==1519387146)
{
digitalWrite(lm,HIGH);
digitalWrite(lmr,LOW);
digitalWrite(rm,LOW);
digitalWrite(rmr,HIGH);
}
//bot moves left
if(results.value==1485832714)
{
digitalWrite(lm,LOW);
digitalWrite(lmr,HIGH);
digitalWrite(rm,HIGH);
digitalWrite(rmr,HIGH);
}
//bot moves right
if(results.value==1485832714)
{
digitalWrite(lm,HIGH);
digitalWrite(lmr,HIGH);
digitalWrite(rm,HIGH);
digitalWrite(rmr,LOW);
}
//bot stops
if(results.value==1217397258)
{
digitalWrite(lm,HIGH);
digitalWrite(lmr,HIGH);
digitalWrite(rm,HIGH);
digitalWrite(rmr,HIGH);
}
}
Note :-
Change the values in the if condition
1.Connect a 9v battery to Arduino .
2.Connect 9v battery to Motor shield.
Place everything on chassis and ready to go

For Queries :-
lkkarthikeya@gmail.com
Code :-
#include <IRremote.h>int lm=9;
int lmr=8;
int rm=10;
int rmr=11;
int RECV_PIN = 6;
IRrecv irrecv(RECV_PIN);
decode_results results;
void setup()
{
pinMode(lm,OUTPUT);
pinMode(lmr,OUTPUT);
pinMode(rm,OUTPUT);
pinMode(rmr,OUTPUT);
Serial.begin(9600);
irrecv.enableIRIn(); // Start the receiver
}
void loop()
{
if (irrecv.decode(&results))
{
Serial.println(results.value);
irrecv.resume(); // Receive the next value
}
//bot moves front
if(results.value==1515192842)
{
digitalWrite(lm,LOW);
digitalWrite(lmr,HIGH);
digitalWrite(rm,HIGH);
digitalWrite(rmr,LOW);
}
//bot moves back
if(results.value==1519387146)
{
digitalWrite(lm,HIGH);
digitalWrite(lmr,LOW);
digitalWrite(rm,LOW);
digitalWrite(rmr,HIGH);
}
//bot moves left
if(results.value==1485832714)
{
digitalWrite(lm,LOW);
digitalWrite(lmr,HIGH);
digitalWrite(rm,HIGH);
digitalWrite(rmr,HIGH);
}
//bot moves right
if(results.value==1485832714)
{
digitalWrite(lm,HIGH);
digitalWrite(lmr,HIGH);
digitalWrite(rm,HIGH);
digitalWrite(rmr,LOW);
}
//bot stops
if(results.value==1217397258)
{
digitalWrite(lm,HIGH);
digitalWrite(lmr,HIGH);
digitalWrite(rm,HIGH);
digitalWrite(rmr,HIGH);
}
}
Note :-
Change the values in the if condition
Construct the Body :-
Place the Motor and wheels in Chassis . Connect the terminals of DC motor to Motor shield (in any way , later it can be modified)
Power supply :-
1.Connect a 9v battery to Arduino .
2.Connect 9v battery to Motor shield.
Place everything on chassis and ready to go

For Queries :-
lkkarthikeya@gmail.com
podu podu thagida thagida
ReplyDeleteGenius
ReplyDeleteSemma da
ReplyDeleteMoney Money Money
ReplyDelete